Have you wanted to upgrade your bathroom sink but lacked the confidence to take on the project? Installing a new sink may seem daunting, but you can complete the job efficiently with some essential tools and following a few simple steps.
This guide will walk you through the entire process from start to finish.
Gathering the Necessary Tools and Materials

Proper preparation is critical to any successful DIY project. Take an inventory of what you’ll need before starting any physical work:
Essential Sink Installation Items:
- Sink – Choose one that suits the size and style of your bathroom. Consider material as well as any desired additional features or accessories.
- Mixer tap or wall-mounted tap – Select a matching finish and tap type.
- Plumber’s putty or silicone sealant – Creates a watertight seal between surfaces.
- Adjustable spanner or adjustable wrench – For tightening fittings.
- Screwdrivers – Both flathead and crosshead (Phillips) types are needed.
- Pipe cutter – This is for accurately sizing supply pipes if alteration is required.
- Bucket – Useful for catching excess water during disconnection/reattachment of pipes.
- Jubilee clips – Reliable clips for securing pipe joints firmly.
It’s also a good idea to have essential protective equipment, like gloves, safety glasses, and an apron, to avoid possible injury or mess. Now that you’ve confirmed you have all the right gear assembled, it’s time to begin!
Isolating the Water Supply
Before disturbing any plumbing components, the first critical safety step is to turn off the water supply. Locate the shut-off valves that control flow to your existing sink:
| Shut-off Valve Location | Notes |
| Under the bathroom sink | Standard position, accessible by removing the kick panel |
| At the mains supply | If the under-sink valve fails or is absent, you’ll need to turn off the water for the whole property |
It’s usually best to start by closing the valve nearest the sink if possible. This allows you to work with minimal disruption to other household water usage. Make sure to test that the taps are indeed dry before commencing any installation tasks.
Removing the Old Sink
Once the plumbing is isolated, you can start clearing the space for the new sink. Begin by disconnecting waste and supply pipe fittings from the bottom of the existing fixture. It may be necessary to loosen or cut pipes depending on your new sink’s dimensions and positioning.
Remove any mounting brackets, silicone, or adhesive still attached around the rim after removing the old sink. Be cautious not to damage surrounding surfaces as you lift out the old unit. Dispose of it responsibly once fully clear.
Thoroughly clean the counter area left behind, making sure no debris or residue remains before setting up the replacement sink. This stage of decluttering streamlines the path to your fresh new look.
Fitting the New Sink
You’re now ready to start constructing your sink’s replacement. Refer to the manufacturer’s instructions for specific installation guidelines if needed. The general process is:
- Fit the pop-up waste mechanism (if applicable) and rubber gasket or o-ring in place beneath the basin.
- Apply a continuous bead of sealant-like silicone around the rim where the sink will meet the countertop surface.
- Carefully position the new sink on the counter and check that it rests evenly without rocking before installation.
- Secure the sink to the surface from below using the supplied mounting brackets, bolts, or other hardware.
At this stage, fittings can be reconnected to the fresh plumbing rough-ins beneath. But take care of any finishing details before moving on to that plumbing aspect of the job.
Reconnecting the Water Supply Pipes
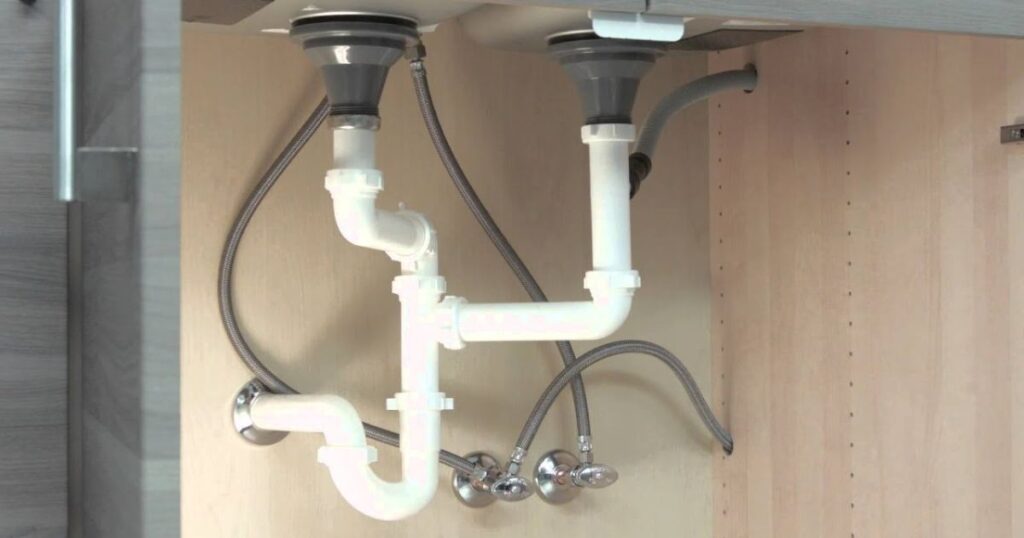
With the sink firmly fixed, it’s time to link it back to the home’s plumbing network. Start with the hot and cold angle valves that regulate water flow into the mixer or taps:
- Ensure the tapered ends of new flexible supply pipes are fully pushed into the valve tailpieces.
- Fasten the joints securely using one jubilee clip per connection. Do not over tighten.
- Gradually turn on the water and check for leaks, tightening further if needed without stripping threads.
- Reattach any trap or pop-up waste systems per the instructions. Apply the plumber’s putty or a wax seal at the drain tailpiece joint.
- Turn on the water thoroughly once confident there are no issues, then test all functions like taps and the drain.
Congratulations – your new sink is now ready to use! Just monitor initially in case any very minor leak appears later on.
Read More Posts
How To Remove A Bathroom Sink Drain: A Comprehensive Guide
How To Fix A Leaky Bathroom Faucet: A Comprehensive Guide For UK/USA Homeowners
FAQs
Can you install your bathroom sink?
Yes, installing your bathroom sink is a project you can complete with the proper tools and following instructions carefully.
What supplies do I need to install a bathroom sink?
The main supplies needed are the sink, faucet, plumber’s putty or sealant, adjustable wrench or pliers, screwdrivers, pipe cutter if necessary, and jubilee clips for securing pipes.
Can you install a sink by yourself?
Yes, it is possible for a capable DIYer to successfully install a bathroom sink working alone, as long as they take all safety precautions and go step-by-step through the process.
Do I need a plumber to install a bathroom sink?
While a plumber can certainly handle the job professionally, you generally do not need to hire a plumber just for a simple bathroom sink replacement if you are handy and willing to take the time to do it right as a self-installed project.
Conclusion
After confirming a watertight installation, a few extra steps finalize the job:
Caulk around the sink edges to protect the mounting surface from wear/splashes. Replace the sink pop-up or plug if applicable for aesthetic continuity. Wipe down and clean your sparkling new sink basin!
Periodically check connections for leaks as part of home maintenance. With proper preparation, focus on each phase step-by-step, and, most importantly, taking safety precautions, any homeowner can feel empowered to install their bathroom sink project.
Just be sure not to rush through steps to guarantee faultless results. Let me know if you have any other questions about sink installation!